
You take card-present payments from Salesforce by connecting Salesforce to Stripe Terminal through one of two architectures — a server-driven integration where Apex drives a smart reader (S700 or WisePOS E) over the Stripe API, or a companion mobile app that uses the Terminal mobile SDK (including Tap to Pay on iPhone or Android) and writes the result back to Salesforce — because Salesforce Apex runs server-side and cannot host the Terminal client SDK itself, the card capture has to happen either on a smart reader Stripe controls or in a native mobile app, with Salesforce as the system of record on either side. That single architectural fact governs every decision below. Get it right and field reps close deals and collect at the table; get it wrong and you have rebuilt a card-not-present flow at higher cost.
We build these integrations. BizSwoop operates a Stripe Connect platform at payments.bizswoop.app, and Jovvie has shipped Stripe Terminal flows across retail, field, and B2B for eight years. This guide is the architecture we would actually deploy for a Salesforce field-sales team — not a theoretical wiring diagram. It sits in our Stripe Terminal for SaaS pillar; the HubSpot + Stripe Terminal integration is its sibling, and the application-fee mechanics referenced throughout are covered in depth in the Stripe Connect platform economics guide.
Why would you take card-present payments from Salesforce?
You take card-present payments from Salesforce when your revenue happens in person but your system of record is the CRM — field sales at a customer site, B2B deals closed at trade shows, and services quoted and collected on the spot — because capturing the card at card-present rates while the Opportunity is already open in Salesforce is cheaper, cleaner, and faster to reconcile than keying the card in later as card-not-present.
Three situations drive almost every Salesforce Terminal project we see:
The field sales rep closes at the customer’s location and wants to collect a deposit or full payment before leaving, with the payment tied to the Opportunity they just marked Closed Won. The trade-show team works a booth, builds Opportunities in Salesforce on a tablet, and needs to take a card at the table without exporting anything. The field-service or B2B AR team delivers or installs, then collects against an invoice generated from Salesforce Billing while standing in front of the customer.
The economic argument is the honest lead. Card-present transactions clear at Stripe’s in-person rate, which is lower than manually keyed card-not-present (MOTO) rates, and they carry lower fraud and dispute exposure because the card is physically present and authenticated. A rep who taps a card at the table instead of phoning it in later saves basis points on every deal and removes the “I’ll pay when I get the invoice” leak. For a team doing volume, that difference funds the hardware many times over.
What is the architecture for Salesforce + Stripe Terminal?
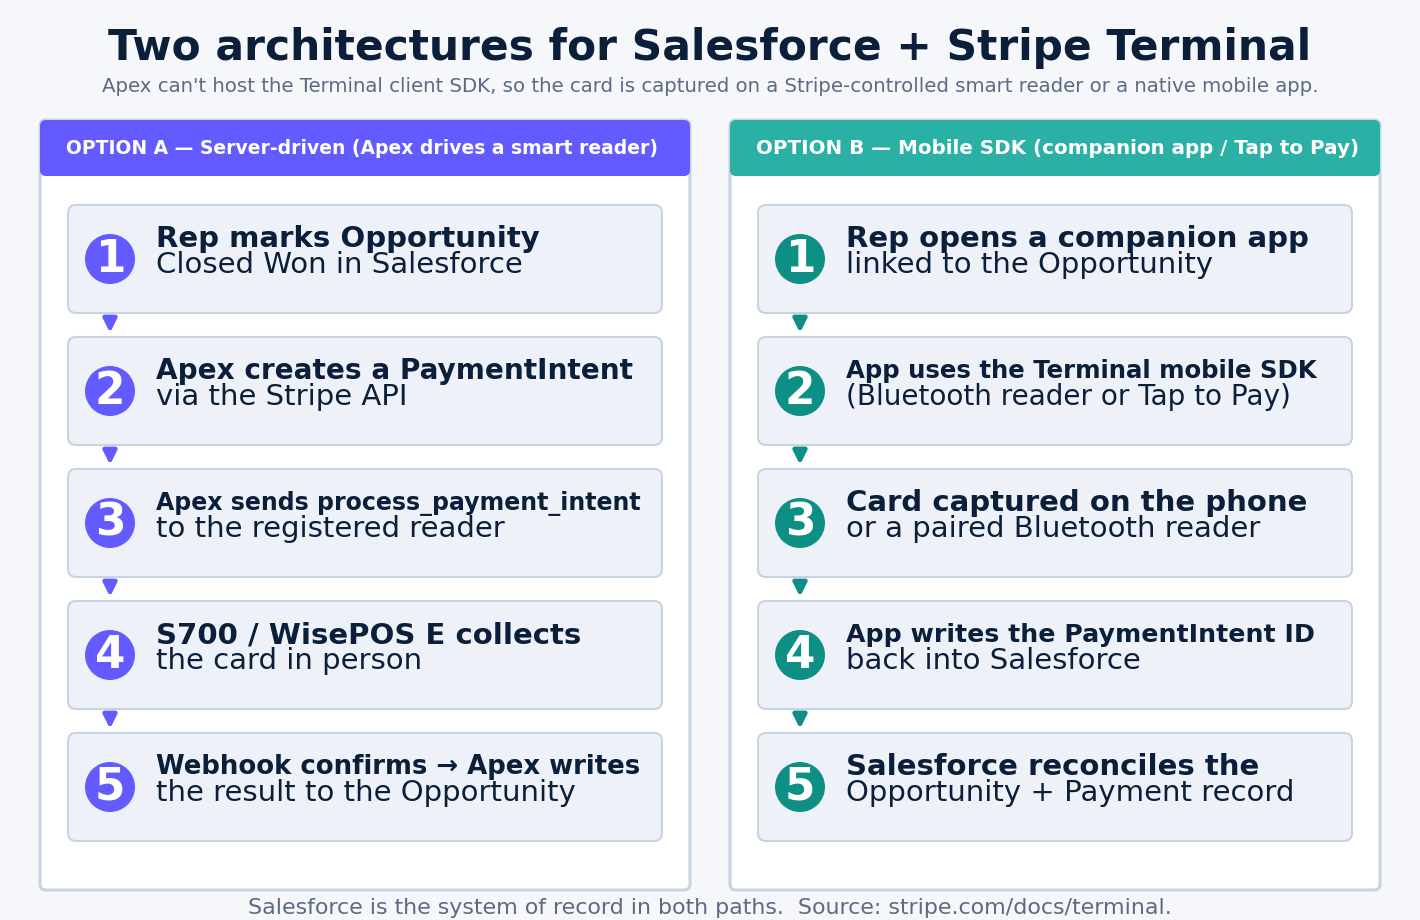
The architecture has two viable shapes, and the correct one depends on where you want the card captured: a server-driven integration where Apex commands a smart reader through the Stripe API, or a mobile-SDK integration where a native app (or Tap to Pay) captures the card and syncs to Salesforce. Both keep Salesforce as the system of record; they differ in what hardware and what code path capture the card.
The reason there are two shapes — and not simply “call the Terminal SDK from Salesforce” — is that the Stripe Terminal client SDKs (JavaScript, iOS, Android) run in a client application near the reader. Salesforce Apex is server-side; it cannot host a client SDK or pair to Bluetooth hardware. So Apex’s role is always the backend role: mint connection tokens, create and confirm PaymentIntents, and record the result. The card capture itself lives somewhere Apex is not.
Option A — Server-driven integration (Apex drives a smart reader)
In the server-driven integration, your backend talks to the reader entirely through the Stripe API — no client SDK required. Because Apex is a backend that can make authenticated REST callouts, Apex is the driver. This is the cleanest fit for Salesforce when the reader is a Stripe smart reader (the Stripe Reader S700 or BBPOS WisePOS E), which are the readers server-driven mode supports.
Flow:
- A rep opens the Opportunity in Salesforce and taps a “Collect payment” action (an LWC or quick action).
- Apex creates a
PaymentIntentfor the amount, then calls the reader via the Stripe API’sprocess_payment_intentaction, addressing the reader by its ID. - The smart reader (S700/WisePOS E) at the table prompts the customer to tap, insert, or swipe.
- Stripe confirms; Apex reads the result and updates Salesforce.
The advantage: no mobile app to build or distribute, and the card path lives on a Stripe-controlled, PCI-certified device. The constraint: it requires a smart reader (not the M2/WisePad, and not Tap to Pay), and the reader needs connectivity.
Option B — Mobile-SDK integration (companion app or Tap to Pay)
When you want Tap to Pay on iPhone or Android (no hardware) or a handheld reader like the M2/WisePad, the card capture must use the Terminal mobile SDK inside a native app. That app can be a Salesforce Mobile SDK app, a lightweight companion app, or a field-service mobile app. It fetches a connection token from your backend, captures the card locally, and writes the confirmed payment back to Salesforce.
Flow:
- The rep uses a mobile app (Salesforce Mobile SDK-based or companion) authenticated to Salesforce.
- The app requests a connection token from your backend (Apex exposed as a REST endpoint, or a small external service).
- The Terminal SDK connects to the reader — or activates Tap to Pay on the phone itself — and captures the card.
- On success, the app calls back into Salesforce (REST API) to update the Opportunity/Payment record.
The advantage: Tap to Pay means zero hardware and a rep needs only their phone. The constraint: you are building and distributing a mobile app, and Tap to Pay has device and enrollment requirements.
Which option should you pick?
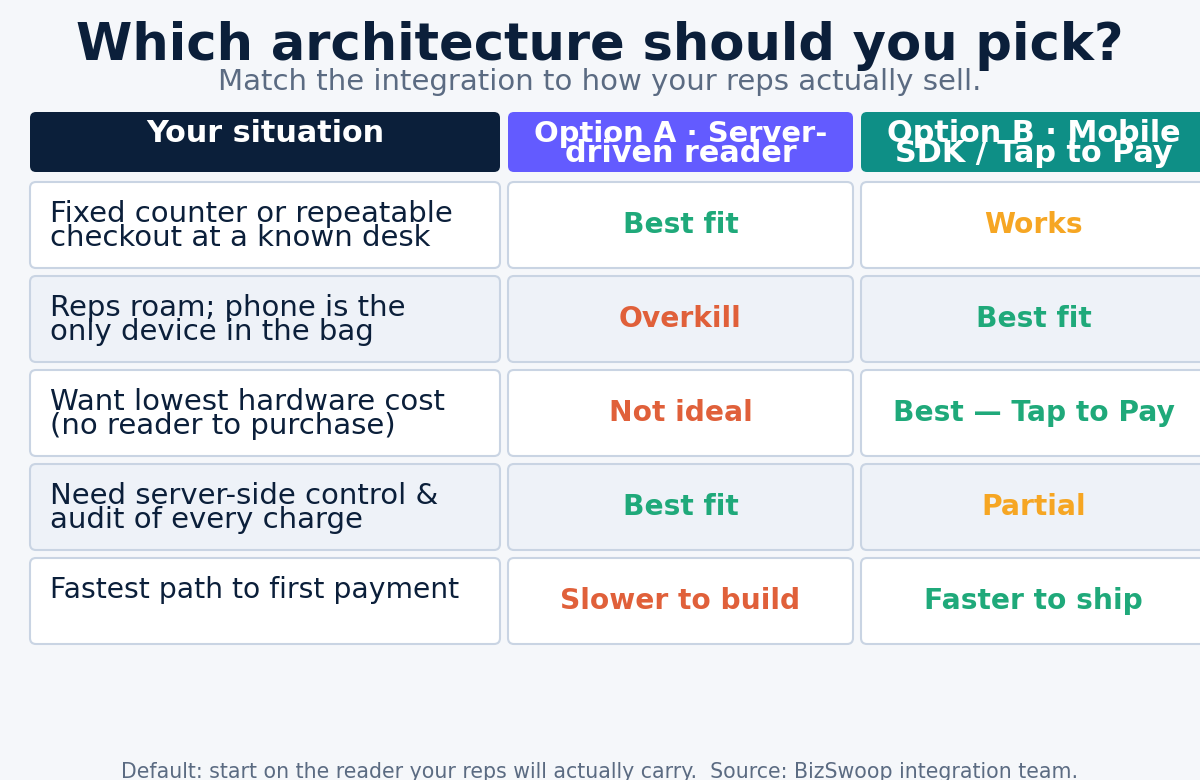
| Factor | Option A — Server-driven (Apex + smart reader) | Option B — Mobile SDK (app + Tap to Pay) |
|---|---|---|
| Hardware | S700 ($349) or WisePOS E ($249) | Phone only (Tap to Pay) or M2/WisePad ($59) |
| Code to build | Apex callouts only; no app | Native mobile app + backend token endpoint |
| Card capture location | Stripe smart reader | Phone / handheld via mobile SDK |
| Best for | Fixed booth, repeatable field routes, low dev appetite | Reps who carry only a phone, widest field coverage |
| Tap to Pay support | No | Yes |
| PCI footprint | Lowest (card never near your app) | Low (SDK handles capture; app never sees PAN) |
| Ongoing overhead | Manage readers | Maintain and distribute the app |
For most Salesforce field-sales teams that want reps to travel light, Option B with Tap to Pay wins on coverage and hardware cost. For a trade-show booth or a repeatable field route where a smart reader can live in the kit, Option A is less to build and keeps the card path entirely on Stripe’s device. Many teams run both: Tap to Pay for the roaming reps, an S700 for the booth.
What Stripe Connect scopes and permissions do you need?
You need a Stripe account (or a connected account under a Connect platform) with the Terminal capability enabled, an API key or Connect access with permission to create connection tokens, PaymentIntents, and Terminal readers/locations, and — if you operate as a platform on behalf of many merchants — the appropriate Connect account type and application-fee configuration. Scope the access to exactly these operations; nothing about card-present requires broad account access.
The concrete requirements:
- Connection tokens. Whatever mints tokens (Apex or a service) needs permission to call the connection token endpoint. In a Connect setup, the token is created on the connected account, so include the
Stripe-Accountheader for the merchant. - PaymentIntents. Create and confirm PaymentIntents with
payment_method_typesincludingcard_present. This is the object that carries the amount and, in Connect, theapplication_fee_amountandon_behalf_of/transfer_datafields. - Terminal readers and locations. Register readers to Locations and, for server-driven mode, address the reader by ID. Managing readers requires Terminal write access.
- Connect model (platform operators only). If you place many merchants on Terminal — the classic ISV/reseller pattern — you choose a Connect account type and take an
application_fee_amountper transaction. The economics of that fee are covered in the Connect platform economics guide; the short version is that Terminal transactions can compensate the integrator on every tap.
Store secrets in Salesforce Named Credentials / External Credentials, never in Apex code or custom settings. Use a restricted Stripe API key limited to Terminal, PaymentIntents, and connection tokens rather than a full secret key. For Tap to Pay, note the additional device eligibility and terms-acceptance requirements Stripe enforces at the SDK level.
How do you build the reference implementation in Apex?
Build the reference implementation as three pieces: an Apex service that mints connection tokens and creates PaymentIntents, an Apex action that drives the reader (server-driven) or a callback that records the result (mobile), and an LWC on the Opportunity that gives the rep a “Collect payment” button. Below is the backbone; treat it as the shape, not copy-paste production code.
1. Connection token / PaymentIntent service (Apex, server-side). Use Named Credentials so the endpoint and auth live outside code:
public with sharing class StripeTerminalService {
// Mint a connection token (used by the mobile SDK, Option B)
@AuraEnabled
public static String createConnectionToken(String connectedAccountId) {
HttpRequest req = new HttpRequest();
req.setEndpoint('callout:Stripe/v1/terminal/connection_tokens');
req.setMethod('POST');
if (String.isNotBlank(connectedAccountId)) {
req.setHeader('Stripe-Account', connectedAccountId); // Connect
}
Http h = new Http();
HttpResponse res = h.send(req);
Map<String, Object> body =
(Map<String, Object>) JSON.deserializeUntyped(res.getBody());
return (String) body.get('secret');
}
// Create a card-present PaymentIntent for an Opportunity amount
@AuraEnabled
public static String createPaymentIntent(
Decimal amount, String currencyCode,
String connectedAccountId, Integer applicationFeeAmount) {
HttpRequest req = new HttpRequest();
req.setEndpoint('callout:Stripe/v1/payment_intents');
req.setMethod('POST');
String bodyStr =
'amount=' + String.valueOf((amount * 100).intValue()) +
'¤cy=' + currencyCode +
'&payment_method_types[]=card_present' +
'&capture_method=automatic';
if (applicationFeeAmount != null) {
bodyStr += '&application_fee_amount=' + applicationFeeAmount;
}
req.setBody(bodyStr);
if (String.isNotBlank(connectedAccountId)) {
req.setHeader('Stripe-Account', connectedAccountId);
}
Http h = new Http();
HttpResponse res = h.send(req);
Map<String, Object> body =
(Map<String, Object>) JSON.deserializeUntyped(res.getBody());
return (String) body.get('id'); // PaymentIntent id
}
}2. Drive the reader (Option A, server-driven). After creating the PaymentIntent, tell the smart reader to process it:
@AuraEnabled
public static void processOnReader(String readerId, String paymentIntentId) {
    HttpRequest req = new HttpRequest();
    req.setEndpoint(
        'callout:Stripe/v1/terminal/readers/' + readerId +
        '/process_payment_intent');
    req.setMethod('POST');
    req.setBody('payment_intent=' + paymentIntentId);
    new Http().send(req);
    // Reader now prompts the customer; confirm outcome via webhook
}
3. The rep-facing LWC. A “Collect payment” button on the Opportunity Lightning page calls createPaymentIntent, then either processOnReader (Option A) or hands the PaymentIntent secret to the mobile SDK (Option B). Show the rep a live status — waiting for card, approved, declined — and the amount pulled from the Opportunity.
4. Confirm asynchronously with webhooks. Do not rely on the synchronous callout to tell you the sale succeeded — the customer is still tapping. Stand up a webhook receiver (a Salesforce Site/Apex REST endpoint, or a small external service that writes back via the Salesforce REST API) for payment_intent.succeeded and payment_intent.payment_failed. The webhook is the source of truth that flips the Salesforce record to Paid. This mirrors Stripe’s recommended pattern in the Terminal integration docs.
Salesforce-specific guardrails: register the Stripe host in Remote Site Settings or (preferred) a Named Credential; respect Apex callout governor limits (100 callouts/transaction, 120s cumulative timeout) — one payment is one callout, so this is rarely a constraint unless you batch; and consult developer.salesforce.com for callout and Named Credential specifics.
How do you reconcile a Terminal payment back to the Opportunity?
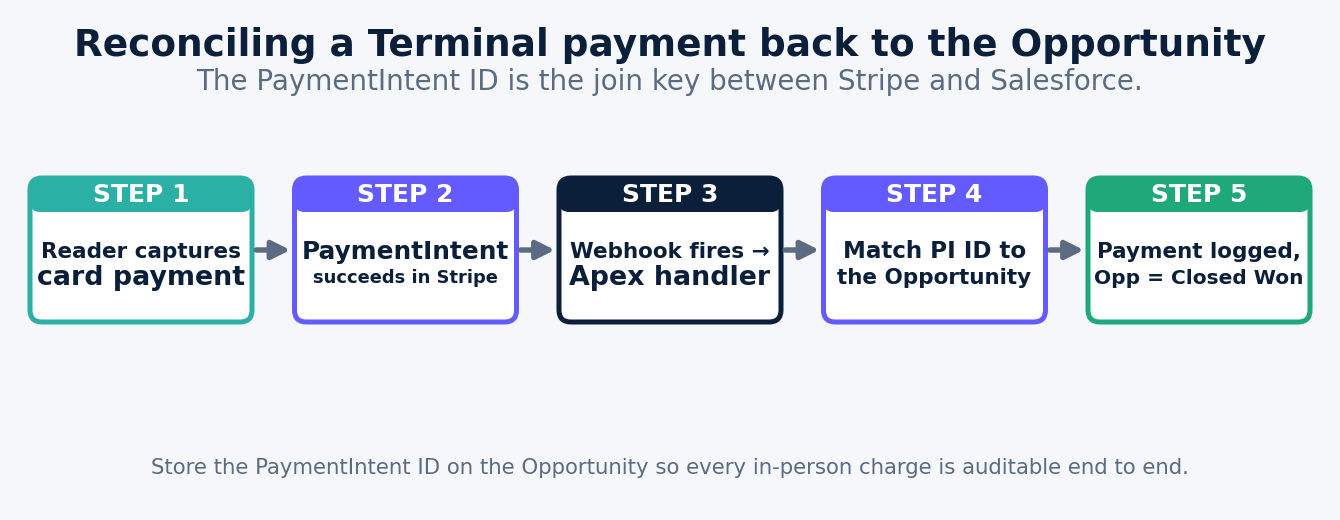
You reconcile by storing the Stripe PaymentIntent ID on a Payment record related to the Opportunity, then letting the payment_intent.succeeded webhook update that record’s status, amount, and captured timestamp — so every card-present sale has a durable two-way link between the Salesforce Opportunity and the Stripe transaction, and reporting rolls up cleanly on both sides.
A reconciliation model that holds up in production:
- Create a
Payment__c(or use Salesforce Billing’s payment object) related to the Opportunity when the rep initiates collection. Stamp it with the PaymentIntent ID immediately, even before confirmation, in aPendingstatus. - On
payment_intent.succeeded, the webhook updates the Payment record toCaptured, writes the net amount, the Stripe fee (from the balance transaction), theapplication_fee_amountif you are a platform, and the captured timestamp. Optionally roll the Opportunity to Closed Won or mark the invoice paid. - On
payment_intent.payment_failed, mark the PaymentFailedand surface it to the rep so they can retry. - Store the Stripe
chargeandbalance_transactionIDs so finance can trace any Salesforce payment to its Stripe payout. This is what makes month-end reconciliation a lookup instead of an investigation. - Report on both keys. Because the PaymentIntent ID lives in Salesforce and the Opportunity/Payment IDs can be written into the PaymentIntent
metadata, you can pivot from either system to the other.
Write the Salesforce record IDs into the PaymentIntent metadata at creation (metadata[opportunity_id], metadata[payment_id]). That one habit turns Stripe-side disputes, refunds, and payout audits into a direct jump back to the exact Opportunity — no spreadsheet matching. For platform operators, the same metadata plus the application_fee_amount gives you per-rep, per-merchant revenue reporting straight out of Stripe.
What about PCI scope, security, and the mistakes to avoid?
A correctly built Salesforce + Stripe Terminal integration keeps the card number out of Salesforce entirely — the reader or the mobile SDK captures and tokenizes the card, and Salesforce only ever sees IDs, amounts, and statuses — which keeps your PCI scope minimal and is the single most important property to preserve as you build.
The PCI advantage is real and worth protecting deliberately. In both architectures, the primary account number never touches your Apex code, your Salesforce database, or your custom objects. In the server-driven option the card lives only on the Stripe-certified smart reader; in the mobile option the Terminal SDK handles capture and your app never sees the PAN. Salesforce stores the PaymentIntent ID, the amount, the last four digits Stripe returns, and the status. That means you inherit Stripe’s PCI posture rather than building your own, and you should design every feature so it stays that way — the moment someone proposes a “just let the rep type the card into a Salesforce field” shortcut, you have converted a low-scope card-present integration into a high-scope card-not-present one at worse rates. Say no to it.
The mistakes we most often clean up on Salesforce Terminal projects:
- Treating the synchronous callout as confirmation. The customer is still tapping when your Apex call returns. Only the
payment_intent.succeededwebhook confirms the sale. Teams that skip the webhook end up with Salesforce records marked paid that Stripe never captured, and vice versa. - Hardcoding secrets in Apex or custom settings. Use Named/External Credentials and a restricted API key scoped to Terminal, PaymentIntents, and connection tokens. A full secret key in a custom setting is an audit finding waiting to happen.
- Forgetting the Connect account header. In a platform setup, connection tokens and PaymentIntents must be created on the connected account with the
Stripe-Accountheader. Omit it and you will mint tokens against the platform account and payments will not route to the merchant. - No metadata link. Without
metadata[opportunity_id]on the PaymentIntent, reconciliation and dispute handling become manual matching. Write the Salesforce IDs into metadata at creation, every time. - Choosing the wrong reader for the architecture. Server-driven mode needs a smart reader (S700/WisePOS E); it will not drive an M2, a WisePad, or Tap to Pay. Picking the hardware before picking the architecture is the most common early misstep.
- Governor-limit surprises in batch collection. One payment is one callout, so single sales are fine, but a “collect on all selected Opportunities” bulk action can hit the 100-callout limit or the 120-second cumulative timeout. Move bulk flows to Queueable Apex or an external service.
Handle those six and the integration is durable. Skip the webhook or the metadata and you will feel it at month-end.
Frequently asked questions
Can Salesforce Apex use the Stripe Terminal SDK directly?
No. The Stripe Terminal client SDKs (JavaScript, iOS, Android) run in a client application next to the reader, and Apex is server-side, so Apex cannot host the SDK or pair to a reader. Apex’s role is the backend: mint connection tokens, create and confirm PaymentIntents, and record results. Card capture happens either on a Stripe smart reader (server-driven mode, which Apex can drive over the API) or in a native mobile app using the mobile SDK.
Can I use Tap to Pay on iPhone with Salesforce?
Yes, but only through a native mobile app that uses the Terminal mobile SDK — Tap to Pay cannot run inside Apex or a browser. Build a Salesforce Mobile SDK app or a companion app that fetches a connection token from your Salesforce backend, captures the card with Tap to Pay, and writes the confirmed payment back to Salesforce via the REST API.
Does this work with Salesforce field service and mobile?
Yes. A field-service rep on Salesforce mobile is the canonical use case. Use the mobile-SDK option (Option B) so the rep collects on their phone via Tap to Pay or a handheld reader, with the payment linked to the work order or Opportunity. The server-driven option fits fixed points like a booth or a service counter better than a roaming rep.
Are card-present rates really cheaper than keying the card into Salesforce?
Generally yes. Stripe prices in-person, card-present transactions below manually keyed card-not-present (MOTO) transactions, and card-present carries lower fraud and dispute risk because the card is physically present and authenticated. Confirm current rates on Stripe’s pricing page; for a full comparison see our back-office pillar on MOTO versus Terminal economics.
Do I need to become a Stripe Connect platform to do this?
No. A single merchant taking their own card-present payments from Salesforce just needs a Stripe account with Terminal enabled. Connect matters when you are an ISV or reseller placing many merchants on Terminal and want to take an application fee per transaction across all of them — that model is covered in the Connect platform economics guide.
What hardware do I need for Salesforce card-present payments?
For the server-driven Apex option, a Stripe smart reader — the S700 ($349) or WisePOS E ($249). For the mobile option, either no hardware at all (Tap to Pay on a supported iPhone or Android) or a low-cost handheld like the M2 or WisePad 3 ($59). Choose by how your reps work: booth and routes favor a smart reader; roaming reps favor Tap to Pay.
Planning a Salesforce card-present rollout? The architecture choice — server-driven versus mobile SDK, Connect versus direct, Tap to Pay versus smart reader — is worth getting right before you write Apex. Book a Salesforce integration scoping call and we will map your field-sales flow, hardware, and reconciliation model to the cleanest build. For the broader pattern across CRMs, start with the Stripe Terminal for SaaS pillar guide.
Sources: Stripe Terminal documentation, Set up your Terminal integration (server-driven & mobile), Use Terminal with Connect, Connection tokens API, Terminal Locations, Tap to Pay setup, Stripe Connect accounts, Salesforce Apex callouts (developer.salesforce.com).
