Does your WooCommerce store stock a range of variable products? By this, we mean products that vary by a single product attribute, like color, design, or size. If so, you’re probably wondering if there is any way to display the different variations in any format other than the default WooCommerce dropdown list.
The standard variation dropdown menu isn’t especially visually appealing or user-friendly, and there are instances where you’ll want to show variations in a more visual format. One way to do this is by displaying your variations with radio buttons. There are various benefits to this approach – it gives your customers more information about each variation from the offset, makes comparisons easier, and improves the user experience.
Unfortunately, default WooCommerce doesn’t support displaying variations as radio buttons – to do this, you’ll need a plugin. In this article, we’ll show you how to go about adding variation radio buttons to your WooCommerce store using Product Manager Add-ons, a highly recommended plugin from BizSwoop.

What is a radio button?
Before we get started, you may be wondering exactly what a radio button is. In simple terms, a radio button is a type of input field that lets users choose one option from a predefined list. They are sometimes called option buttons, and the idea is that all of the product options or variations are displayed for customers to see right away. This includes the color options, sizes, patterns/designs, or any add-ons. All the customer has to do is select the option that suits their needs without having to open any dropdown menus to review the available choices.
Some eCommerce stores may also implement checkboxes to display options in a list format for customers to select. However, there’s one crucial difference between these and radio buttons. Radio buttons only let you select ONE option from the list, while checkboxes allow multiple selections. So, in cases where options must be mutually exclusive – like product variations – radio buttons are a natural choice.
Why display your variations as radio buttons?
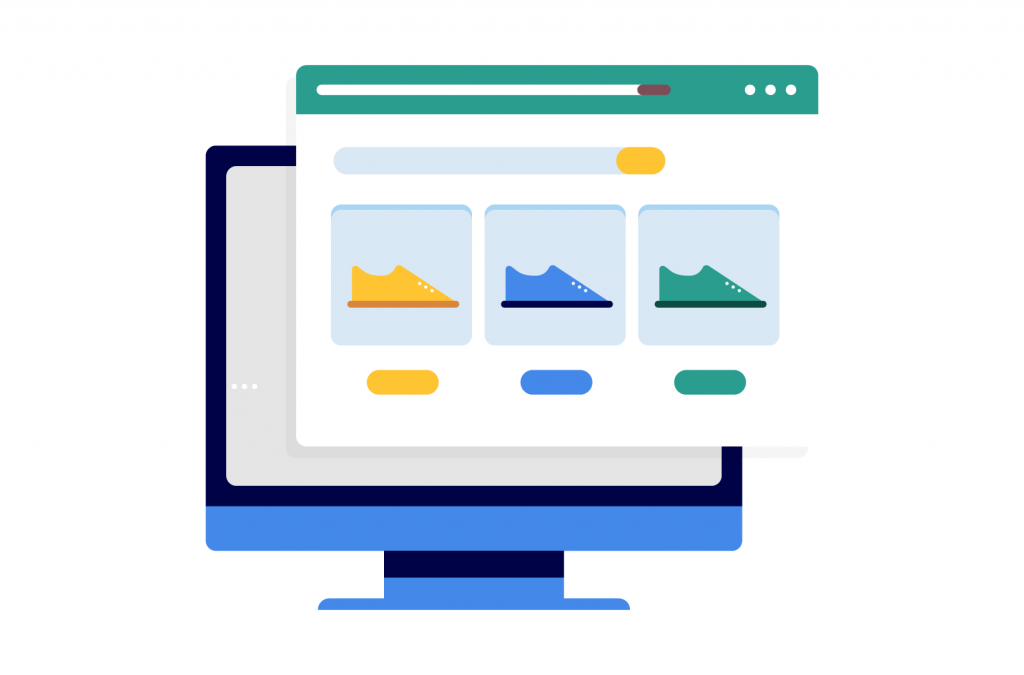
On WooCommerce, the default way to display product variations is via a dropdown list on the product pages. It’s not an awful method, but it does make it harder to directly compare product variations – especially if you’ve added color or image swatches to your different variations as you can’t review all the options in one place.
WooCommerce variation radio buttons bypass this issue. Moreover, they present some serious potential benefits for WooCommerce store owners and customers alike:
- Much easier comparisons – Radio buttons make it far easier for customers to compare variations by displaying them all side-by-side on the product page. This allows customers to make faster decisions, which could prevent them from abandoning their purchases.
- Improved variation visibility – It is also easier for customers to instantly see all of the available variations straight away. There’s no need to click on a dropdown box and scroll through a list, which can be time-consuming and not very user-friendly, particularly on mobile devices.
- Extra information right away – Furthermore, radio buttons let you show extra information about each variation (like price, color and image swatches, or short descriptions) directly on the product page. Again, it makes the buying experience far more straightforward for the customer, which can increase the chance of them completing their purchase.
How do you display your WooCommerce variations using radio buttons?
As we’ve already discussed, the default feature set of WooCommerce doesn’t let you display variations as radio buttons – the only input field type it supports for variation display is a dropdown list. If you want to display your variations as radio buttons, you’re therefore going to need a supplementary WooCommerce plugin.
This is where Product Manager Add-Ons comes into play. This plugin by BizSwoop delivers a wide range of extra functionality to your WooCommerce store that goes far beyond simply displaying your WooCommerce product variations in a more user-friendly format. Let’s take a look at some of the plugin’s best features:
- A user-friendly interface – Product Manager Add-Ons doesn’t just let you display variations using radio buttons. It goes one step further and provides options to enhance the display of these variations on your product pages. You can add thumbnail images, descriptions, and more to your variations, offering a clearer picture of what’s available to your customers.
- Customizable add-on options – Product Manager Add-Ons enables customers to customize just about everything relating to your products through the creation of flexible product add-ons. You can build custom add-ons for your WooCommerce products using a range of different input fields (including checkboxes, text fields, and image upload fields).
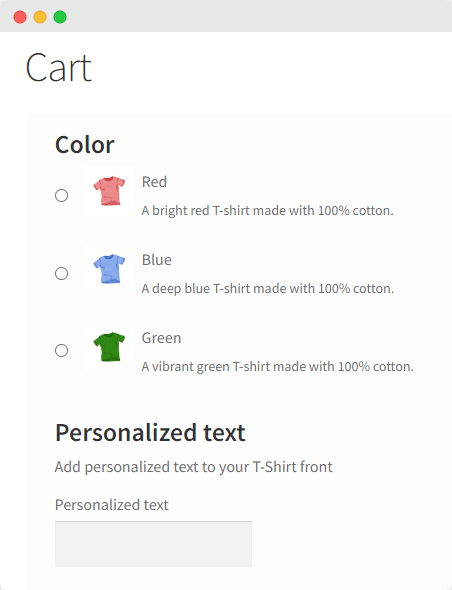
- Cart and checkout add-ons – The plugin also makes it a breeze for customers to switch between variations all the way to the checkout, thanks to the option to include variation radio buttons on the cart and checkout pages. This streamlines the buying process as customers don’t have to navigate back through your product pages to make any last-minute changes to their orders.
Product Manager Add-ons is one of the most comprehensive WooCommerce product add-ons plugins currently on the market – and it’s also one of the most cost-effective. You can download the plugin for only $49/year, with a 14-day money-back guarantee.

The #1 Add-Ons Plugin
for WooCommerce
Create custom products with checkboxes, color swatches, text, file upload & more - on the product page, in cart or at checkout!
How to add radio buttons to variations in WooCommerce using Product Manager Add-Ons
Now that we’ve taken a look at the benefits that Product Manager Add-ons could bring to your WooCommerce store, let’s take a look at how to use it to add WooCommerce radio button variations. In this section, we’ll provide a step-by-step tutorial to help you get everything up and running.
Here are the steps you need to follow.
1. Download and install the plugin – remember that there is a 14-day money-back guarantee available, so if you are unsure if the plugin is right for your store, this will give you time to test it out.
2. Head to your WooCommerce dashboard, navigate to Products > Add-on Groups, and click ‘Add New’.
3. Configure the add-on group options: the name, where you want the add-on to appear (all product pages, specific product pages, cart page, checkout page, or cart and checkout pages).
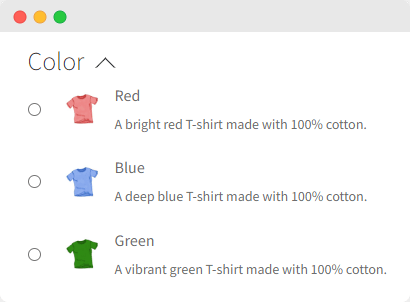
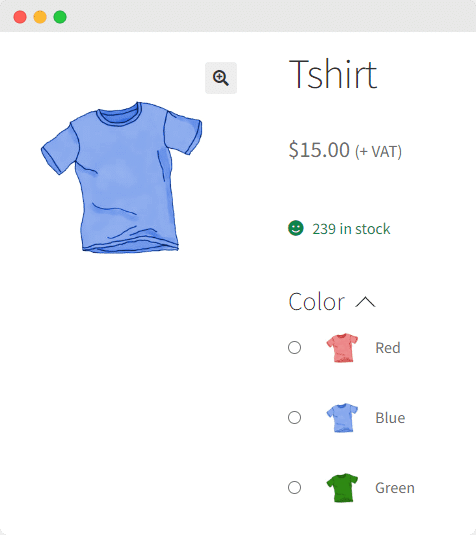
4. Click ‘Add Row’ to add a new add-on. For the purpose of this tutorial, we’ll show you how to add radio buttons for different color variations to our T-shirt product. So, we’ll call our add-on ‘Color’. Once you’ve created your new add-on, you’ll need to configure a few options:
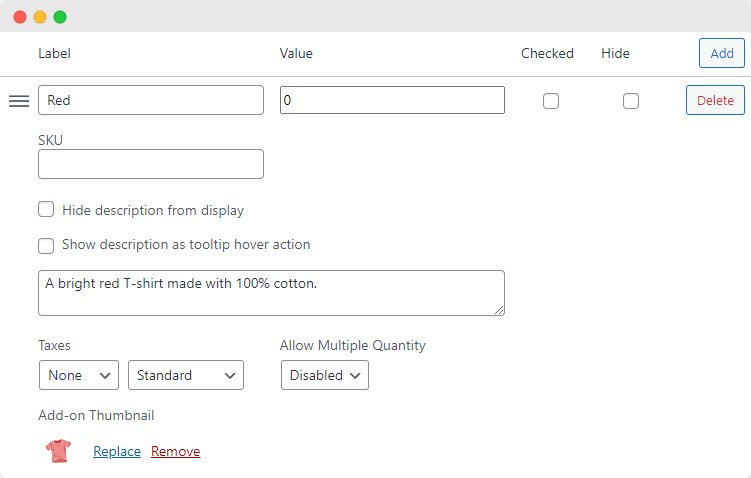
- Configure the add-on display – we’ll select the ‘radio button’ option here, but there are many other input field options available.
- Configure the pricing – you can choose between flat rate, percentage, or subtotal percentage. If you don’t want to charge for your add-ons, or just want to use this tool to show variations in a more intuitive way, you can set the price for each add-on/variation option as ‘0’ in the next step.
- Add a description and configure the description display – for example, you can choose to always display the description, display it on mouseover, or hide it entirely.

5. Now that you’ve configured your add-on, click ‘Add row’ to create your first variation. From here, there are a few more options to configure:
- Add the add-on price if applicable – as we’re just using this add-on to help display our product variations, we’ll set the price as ‘0’.
- Add a description, and configure the display options.
- Configure if the customer can add multiple copies of the add-on – in this case, as we’re using the tool to display variations, we’ll disable this feature.
- Add an add-on thumbnail – this lets you show different color swatches or images of different variable attributes like patterns or materials.
6. Add as many different add-on options/variations as you need, and as many different add-on rows as required. For example, continuing with the T-shirts example, you could:
- Add personalized text using Product Manager Add-Ons’ text input field option.
- Add a design or image using Product Manager Add-Ons’ file upload field option.
7. Once you have finished configuring your add-on options, save your changes and check how the add-on groups look on the front end of your eCommerce store.
Bonus: Take your variation display to the next level using Product Tables for WooCommerce
If you follow the steps above, you will now be in a position where radio button variations are displayable on your WooCommerce store. However, what if you wanted to take things to the next level? Why don’t you make it even easier for your customers to view and compare product variations? After all, the simpler the whole process is for customers, the more chance there is of converting visitors into sales.
Consequently, you may wish to consider displaying your product variations in a visual table format. To do this, all you need to do is download Product Manager Add-Ons’ sister plugin, Product Tables for WooCommerce.
With this plugin, you can:
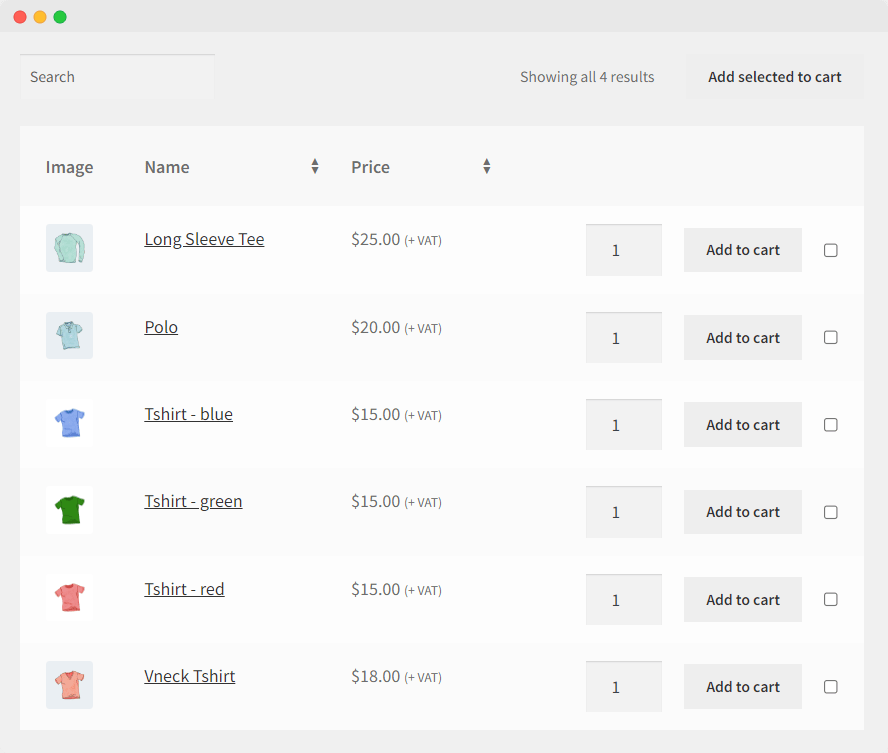
- Show all variations in a table for simple comparisons – Display all of the product variations as separate rows in the table to make it easy for customers to compare each item.
- Add extra info for each variation – Include thumbnail images, descriptions, pricing, and an “add-to-cart” button for every variation in the table.
- Enable quick adding of product variations to the cart – Make it easy for customers to add product variations individually or in bulk using the “add-to-cart” buttons for each variation. Alongside this, you can use checkboxes and a quantity selector for bulk adding.
Improve the user experience of your WooCommerce store with variation radio buttons
Displaying WooCommerce variations using radio buttons improves the overall customer experience of your online store. Your customers can easily see and select variations right away, without having to deal with dropdown boxes and other inconveniences. In turn, this streamlines the sales funnel and can lead to more conversions and fewer cart abandonments.
Product Manager Add-Ons is the best plugin for displaying variations as radio buttons, thanks to its range of excellent features. It has a user-friendly visual display, a wide range of customizable add-on options, and you can even display your add-ons or variations on the cart and checkout pages.
Product Manager Add-ons is available for only $49/year, with a 14-day money-back guarantee.
The #1 Add-Ons Plugin
for WooCommerce
Create custom products with checkboxes, color swatches, text, file upload & more - on the product page, in cart or at checkout!