
It’s no secret that people enjoy pizza. In fact, they love it. There are more than 75,000 pizza restaurants in the United States alone, which took a combined $46 billion in sales in 2021.
So if you run a pizza business, then you can have confidence that there’s certainly a market for your offering. However, it’s also true that competition can be fierce. Pizza restaurants that want to succeed in the crowded marketplace must, therefore, offer the best customer experience possible. One way to do this is to add a pizza builder to your website for online sales, which will allow your customers to purchase a pizza that has the specific ingredients they want.
If your website runs on WordPress or was created with an AI website builder, then you’ll likely know that WooCommerce does not offer in-built pizza builder functionality. Thankfully, there are plugins available that make adding a pizza builder to the product pages on your online store or restaurant a breeze.
In this article, we’ll look at why you should consider adding a pizza builder to your WordPress website, then show you how to set one up using the best WooCommerce pizza builder plugin on the market.

Why should you offer a pizza builder on your WordPress site?
Adding a pizza builder to your WooCommerce product pages provides an easy means for your customers to create custom products by offering extra options like a choice of toppings, different crust options, different sizes of pizza, and more. This, in turn, can provide numerous benefits for your business, including:
Improved customer service
Some customers are happy with any pizza, but the majority are looking for a specific type. By adding a pizza builder plugin, your customers can get the pizza they want without the need for you to offer dozens of different varieties of pizza on your restaurant menu. This will enhance their overall experience, helping to increase conversions, recommendations, and repeat business.
Increased sales
Customers know they have a choice when buying a pizza online. As we’ve already mentioned, with more than 75,000 pizzerias open in the USA alone in 2021, your restaurant needs to find a way to stand out. Online restaurants that offer custom pizzas set themselves apart from the competition by ensuring the customer can always get their preferred pizza, helping to prevent lost sales and giving you the edge over competitors that don’t offer this service.
Save time
Your staff should be busy making pizzas, not taking complicated orders on the phone. The customization offered by a pizza builder plugin enables your customers to personalize their own orders, saving your employees time and reducing the chance of errors since all the information in each customer’s order is recorded digitally.
How do you create a pizza builder for your WordPress website?
Ready to begin selling custom pizzas via your WordPress website? It’s as easy as pizza pie, but before you enjoy the benefits, you’ll need to integrate your WordPress site with WooCommerce. There’s no native functionality to add a pizza builder within WooCommerce, but it does enable you to build the base pizza products which customers can then customize. It’ll also allow you to track inventory, manage payments, and much more.
To add a pizza builder option to your website, you’ll need a supplementary plugin. Our recommended choice is Product Manager Add-Ons from BizSwoop, which comes packed with features that make it the perfect option for online pizza restaurants. Let’s dive into some of the ways in which Product Manager Add-ons can help your online pizza restaurant stand out from the competition.
Attractive display
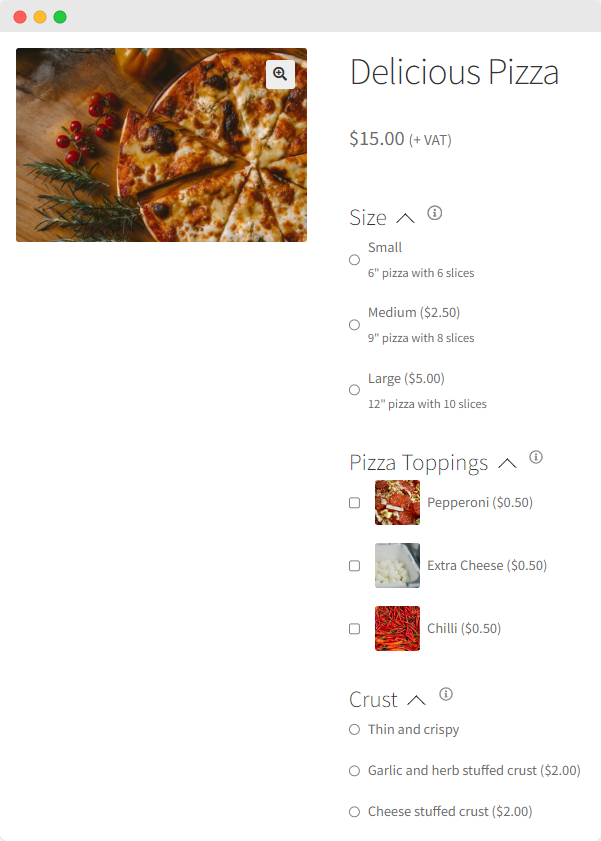
Customers prefer engaging websites. Product Manager Add-Ons allows you to group different product add-ons together, which helps the customer with their product selections. With this feature, you could have all your topping options in one group, the pizza size in another, and different crust options in another, for example.
You can also add thumbnail product images to each add-on to boost the visual display, and even include add-on input fields on your cart and checkout pages. This is perfect if you want to give your customer to option to leave a tip or provide any special delivery instructions.
Flexible add-on creation
Product Manager Add-Ons supports multiple custom input fields, which allows for a wide variety of different add-on types. Additional field types enhance the customer experience by allowing them to include extra information like dietary requirements, delivery instructions, and so forth.
Omnichannel compatibility
Does your pizza restaurant also take in-person orders? Product Manager Add-Ons has you covered. The plugin is designed to work seamlessly for both online and in-person sales.
Compatibility with all the most common WordPress themes and popular page builders like Elementor means you can be confident that Product Manager Add-ons will be a good fit for your online store. The plugin works perfectly on both desktop and mobile, meaning your customers will always have a seamless experience regardless of how they place their orders.
For in-person sales, Product Manager Add-ons pairs seamlessly with WooCommerce POS systems and has particularly close integration with Jovvie, its sister plugin from BizSwoop.
The pairing of these two plugins allows you to create complex products within your restaurant POS interface, which you can use to offer advanced product creation options to your customers. Another major benefit is that you can synchronize your inventory between online and offline sales, meaning you will always have an accurate view of stock levels across all channels.

The #1 Add-Ons Plugin
for WooCommerce
Create custom products with checkboxes, color swatches, text, file upload & more - on the product page, in cart or at checkout!
Step-by-step tutorial for adding a pizza builder to your WordPress website with Product Manager Add-ons
Enhance your customer’s experience and get more business by adding a pizza builder to your WordPress website with Product Manager Add-ons. You can set up a pizza builder for your eCommerce site in a matter of minutes by following these simple steps:
Step 1: Download and install the plugin
You can get the Product Manager Add-Ons plugin directly from the BizSwoop website. The plugin starts at $49/year, with a 14-day money-back guarantee available.
Step 2: Create your base pizza product
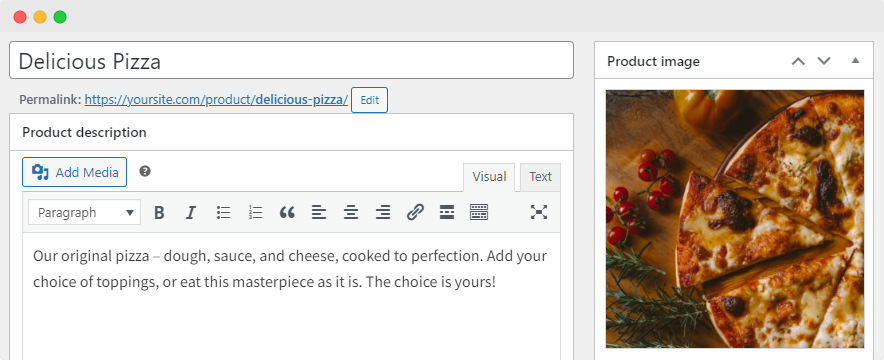
Before you create your pizza builder, you’ll need a base pizza product for your customers to personalize. This can be done using the default WooCommerce product builder.
From the WordPress dashboard, go to Products > ‘Add New’ to create your base pizza product. Configure the product settings, including the name of the pizza, the product price, a description, and an image.
Then, when you’re happy with the product, hit ‘Publish’ to make your new product available through your online pizza store.
Step 3: Create your first product customization option
With your base pizza product ready to go, you can start work on creating your pizza builder.
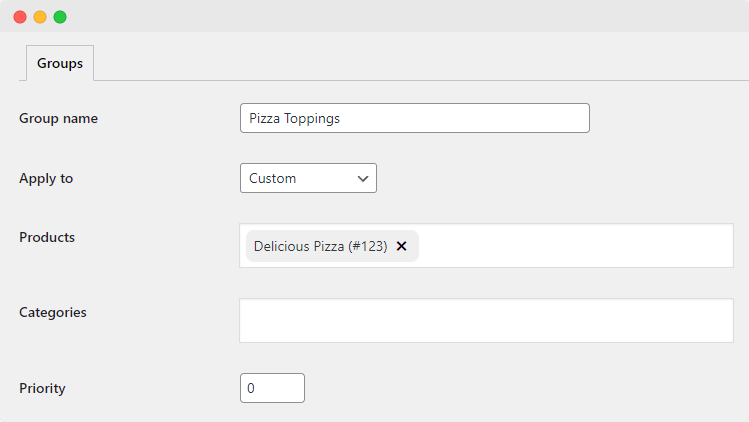
Start by going to Products > Add-on Groups and click ‘Add New.’ This will create a new add-on group. From here, you’ll want to select the display location. You can set this as the cart, checkout, all product pages, or specific product pages.
In this instance, as we want customers to be able to customize our base pizza product, we’ll set the display location to ‘Custom’, then add our pizza product to the ‘Products’ field. If you wanted to offer customization options for all of your different pizzas, you could do this easily by applying your add-on group to the product category ‘Pizzas’.
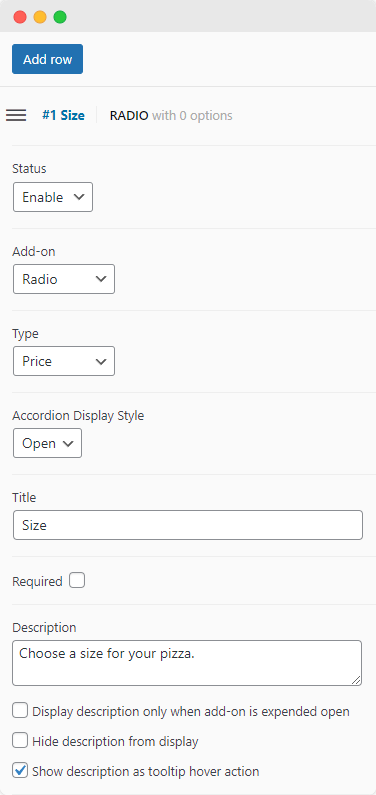
Next, select ‘Add Row’ to create a new add-on for the group. From here, you can configure all the add-on options:
- Name the add-on. For example, if it’s to select the size of the pizza, call it ‘size.’
- Choose an add-on input field. In the case of size selection, it’s best to use a drop-down menu or radio button, since these only allow one selection, whereas a checkbox field will allow customers to choose multiple options.
- Choose the pricing structure. For ingredients, this may be a set price; if you want to add an option for tipping, it could be a percentage of either the product price or the overall bill.
- Add a description for the add-on if required.
- Decide whether the customer is required to select an option for the add-on. For example, customers will need to choose a size of pizza, so when adding an add-on option for this, you would check ‘Required’. Other add-ons, like extra toppings, can be set as optional.
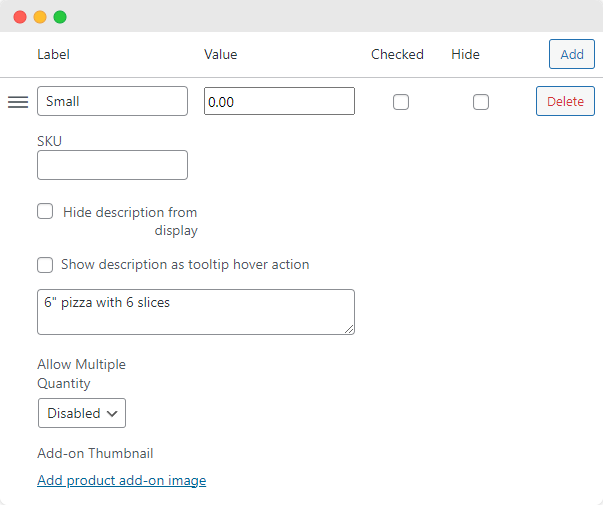
Once you’re happy with your add-on, click ‘Add Option’ to begin creating your first add-on option. These are the specific choices customers will make when customizing their product. For example, the different sizes of pizza, toppings, or crust options available. There are some straightforward options to configure for each add-on choice:
- Choose a name for your add-on option. For example, in the ‘size’ selection, your first add-on option could be called ‘small.’
- Add the cost (note that if the add-on is free, you can set the value as ‘0’).
- Add an SKU code, if required, to help with inventory management.
- Decide whether multiple copies of the same add-on are allowed. If enabled, a customer can request a quantity of each topping.
- Add an image, if appropriate, to enhance the visual appearance of the add-on options.
Once you are happy with your add-on and the associated options available to your customers, save your changes.
Step 4: Create your remaining product customization options
Follow the process from Step 3 to add any additional customization options. Below are some ideas to inspire you:
- The type of crust (since only one selection is allowed, use a radio button or dropdown field with your sizes.
- Additional toppings (a checkbox field will allow customers to choose multiple additional toppings).
- Delivery time (use a dropdown field or radio button to enable customers to choose from a list of available times).
- Special delivery instructions (use a text input field to enable customers to add any extra information).
Step 5: Create a tipping add-on for the checkout
You can also use the instructions from Step 3 to add a tipping add-on, which you can add to the checkout page.
As we mentioned earlier, you can choose to offer tipping options based on the overall order amount, the price of individual products, or offer flat-rate tipping options (i.e., allow your customers to tip a standard amount).
Step 6: Test out your pizza customization options on the store front end
Once you’re happy with your array of add-on options, take a look at how your pizza customization options appear and function on your website. If everything looks good, then you’re ready to go! If you have adjustments to make to your add-ons, you can use the ‘Edit’ button on the ‘Add-On Groups’ page to easily make changes to any add-on group.
Using plugins to take your WooCommerce pizza restaurant to the next level
Product Manager Add-Ons isn’t the only plugin that pizza restaurants can use to create a better customer experience. In fact, BizSwoop offers a whole range of WooCommerce plugins that can help bring your online pizzeria to the next level.
Jovvie
Product customization isn’t just for online orders. We’ve already explored how Jovvie can bring all of the product customization options of Product Manager Add-ons to your physical restaurant, but if you want to go one step further, Jovvie’s kiosk mode can be utilized to enable customers to build their own pizzas at a self-serve checkout.
This will not only help to reduce wait times and ensure your customers get the pizza that they want but also help reduce the chance of human error when your staff are taking orders.
Pickup Delivery Scheduler
Get a handle on your delivery schedule and offer a wider range of food delivery options by using Pickup Delivery Scheduler. This plugin allows you to provide custom delivery and takeout options to your online customers, who can select the pickup or delivery time that they want. This plugin also allows you to limit the number of orders that can be selected for a particular time slot, ensuring your team can always deliver on time.
Flow Notify
Customers like to know what’s happening with their orders. With Flow Notify, you can send your customers custom notifications at every stage of the order process via SMS, email, or WhatsApp. For example, you could send custom, personalized notifications to your customers at some or all of the following stages:
- Order Preparation.
- Baking.
- Quality Assurance.
- Out for Delivery.
Store Order Hours
Store Order Hours provides your customers with a clear understanding of your digital store’s opening hours, for example, the hours that you deliver pizzas and the delivery/pickup options available to them at any given time. Using this plugin, you can create a visually appealing digital store sign that will ensure that your customers always know when your online pizza restaurant is open for business.
Help your online restaurant stand out with a WooCommerce pizza builder
All online pizza businesses can benefit from enhanced customer experience, more sales, better staff efficiency, and reduced errors, and that’s just what a pizza builder option brings. Offering a wide range of add-on types, flexible display options, and seamless integration with WooCommerce POS systems, Product Manager Add-Ons from BizSwoop is the ideal pizza builder plugin for omnichannel restaurants.
If you’re ready to take your online pizza restaurant to the next level, you can try out Product Manager Add-Ons from just $49/year, with a 14-day money-back guarantee.
The #1 Add-Ons Plugin
for WooCommerce
Create custom products with checkboxes, color swatches, text, file upload & more - on the product page, in cart or at checkout!