
Tap to Pay on iPhone with Stripe: Setup Guide for 2026

To set up Tap to Pay on iPhone with Stripe you need a supported iPhone (iPhone XS or later), a current iOS version (16.7+ in the US, UK, and Australia), a Stripe account with Terminal enabled, and an app built on the Stripe Terminal iOS SDK with Apple’s Tap to Pay entitlement — there is no separate hardware reader to buy or pair. The contactless payment is read by the iPhone’s own NFC antenna, so the entire setup is a software exercise: enable Terminal in your Stripe account, request the Apple entitlement, integrate the SDK, and test against a real card.

We have shipped Stripe Terminal flows across retail counters, pop-ups, field-service trucks, and mobile teams in more than 30 countries, and Tap to Pay on iPhone is the configuration we recommend most often when a business already hands staff an iPhone and does not want one more device to charge, track, and replace. This guide is the setup walkthrough we wish existed: the exact requirements, the entitlement flow that trips up most first-time integrators, how to test the loop end to end, and an honest account of where Tap to Pay on iPhone stops being the right answer. Every claim is checked against Stripe’s primary documentation, linked throughout.

This is a cluster piece in our Stripe Terminal hardware library. If you are choosing between Tap to Pay and a physical reader, start with the hardware pillar; if your staff carry Android phones, read the companion guide on Tap to Pay on Android with Stripe: A 2026 Setup Guide. If you are taking the occasional card without a register at all, the Stripe Terminal for Back-Office Payments guide covers when contactless-on-phone beats a counter setup.

What is Tap to Pay on iPhone with Stripe?

Tap to Pay on iPhone with Stripe is a software feature that turns a supported iPhone into a contactless card reader, accepting tap payments — physical contactless cards, Apple Pay, Google Pay, and other mobile wallets — directly through the phone with no external hardware.

The payment is read by the iPhone’s built-in NFC antenna and processed through your Stripe account using the Stripe Terminal iOS SDK, the same SDK that drives Stripe’s physical readers like the S700 and WisePad 3. From Stripe’s perspective, a Tap to Pay charge is a card-present Terminal transaction: it settles at the card-present rate, appears in your dashboard with the same data as a reader charge, and reconciles identically. The difference is purely the capture device — the customer taps the back of the iPhone instead of a dedicated reader. Apple processes the contactless read inside a secure subsystem on the device, so card data never passes through your app. Stripe documents the full picture in its Tap to Pay setup reference.

This matters for the buying decision because Tap to Pay on iPhone removes the single most annoying part of mobile card acceptance: the second device. There is no reader to charge overnight, no Bluetooth pairing that drops mid-sale, and no $59-to-$349 hardware line item. If your team already carries iPhones, your hardware cost for accepting in-person cards is effectively zero. What you are buying instead is a small amount of integration work and a set of constraints, both of which this guide covers in full.

How much does Tap to Pay on iPhone cost with Stripe?
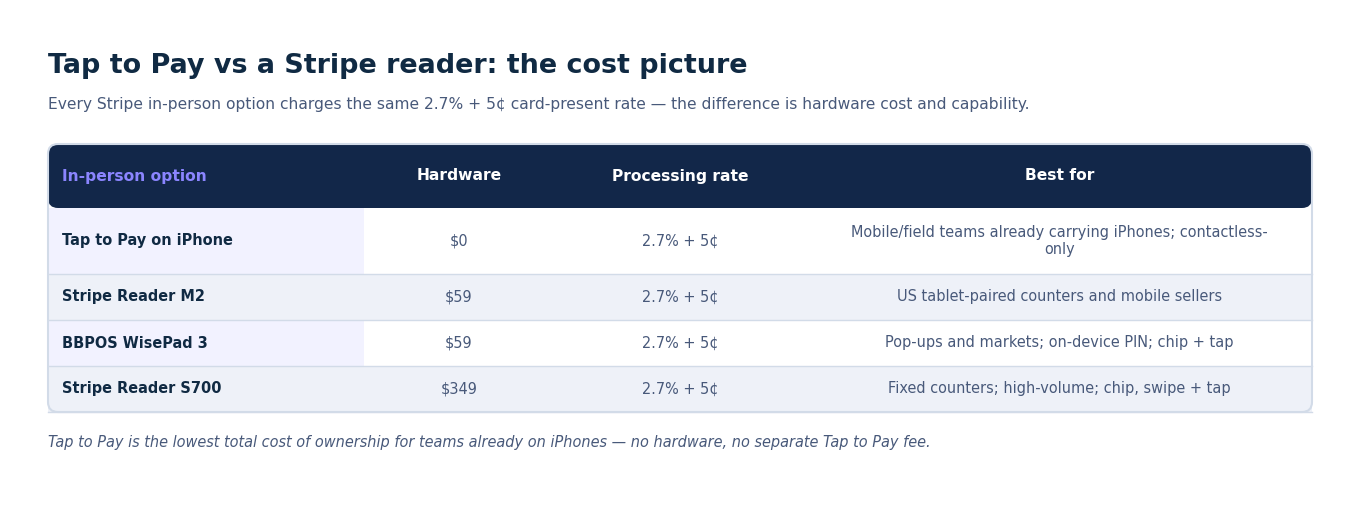
Table comparing Tap to Pay, M2, WisePad 3 and S700 on hardware cost and the shared card-present rate
Every Stripe in-person option charges 2.7% + 5¢; Tap to Pay just removes the hardware line item.

Tap to Pay on iPhone charges the same Stripe card-present processing rate as any Terminal reader — 2.7% + 5¢ per successful transaction in the United States, per Stripe’s pricing page — with no hardware cost and no separate Tap to Pay fee.

That is the quiet advantage: you get Stripe’s lower card-present rate (versus the 2.9% + 30¢ online rate) without buying any hardware. The only costs are your Apple Developer Program membership ($99/year, which most teams shipping an iOS app already pay) and the engineering time to integrate the SDK. Over a three-year horizon, Tap to Pay on iPhone is the lowest total cost of ownership of any Stripe in-person option for businesses that already deploy iPhones.

What devices and iOS versions does Stripe Tap to Pay require?
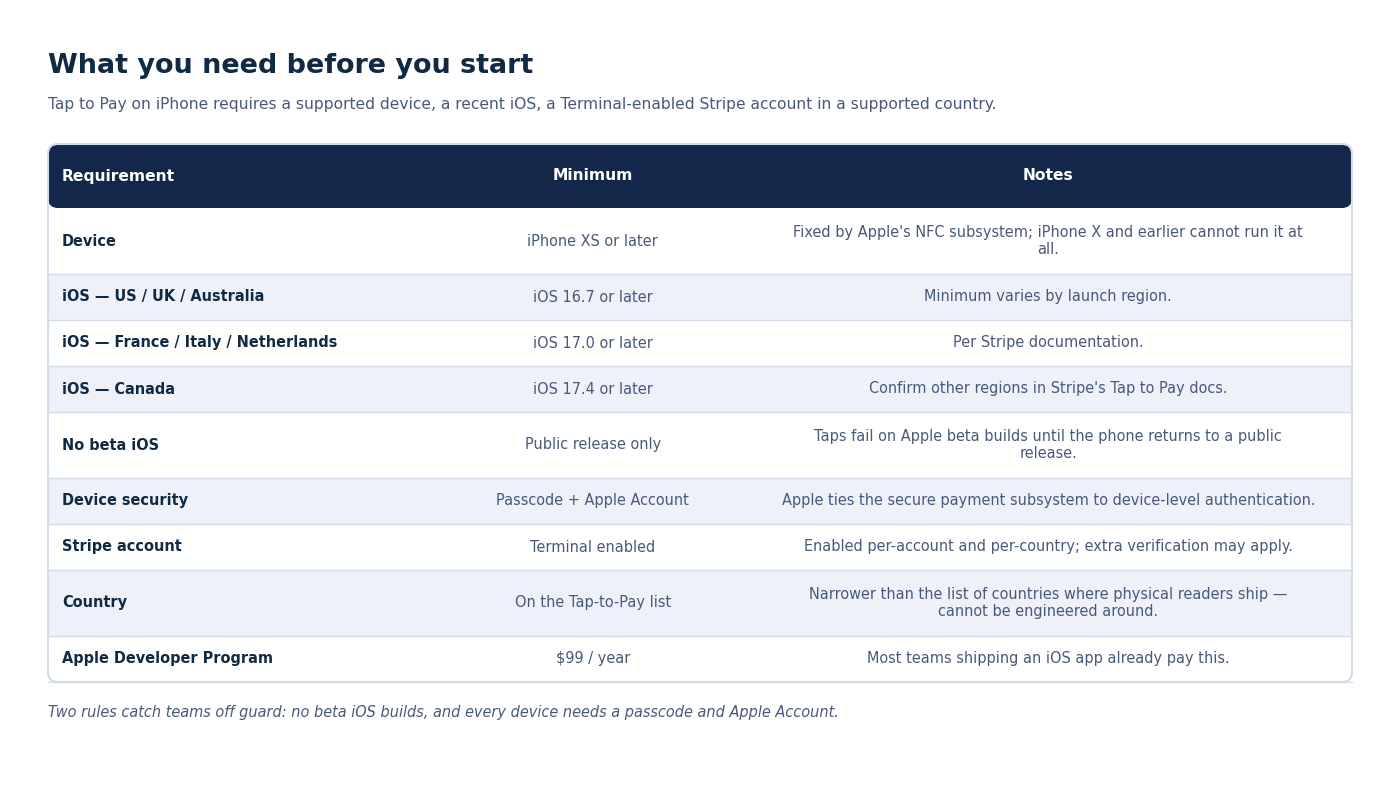
Requirements table listing iPhone XS or later, per-region iOS minimums and Stripe account prerequisites for Tap to Pay
Two rules catch teams off guard: no beta iOS builds, and every device needs a passcode and Apple Account.

Tap to Pay on iPhone with Stripe requires an iPhone XS or later running a recent iOS version, and the minimum iOS depends on your country.

The hardware floor is fixed by Apple, not Stripe: any iPhone XS or newer has the NFC subsystem Tap to Pay needs. Older models (iPhone X and earlier) cannot run it at all, regardless of iOS version. The iOS minimum varies by launch region because Apple rolled the feature out on different timelines. Per Stripe’s documentation, the current minimums are:

RegionMinimum iOS version
United States, United Kingdom, AustraliaiOS 16.7 or later
France, Italy, NetherlandsiOS 17.0 or later
CanadaiOS 17.4 or later
Other supported regionsCheck Stripe’s Tap to Pay docs for current minimums

Two device rules catch teams off guard. First, Tap to Pay does not run on iOS beta releases — if a staff member has enrolled their phone in Apple’s beta program, taps will fail until they return to a public release. Second, the phone must have a passcode set and be signed in to an Apple Account, because Apple ties the secure payment subsystem to device-level authentication. We check both of these before any rollout; a device fleet that “meets the spec” on paper can still fail in the field because half the phones are on a beta build or have no passcode.

What Stripe account requirements must I meet first?

Before any code runs, your Stripe account must have Terminal enabled and be in a country where Tap to Pay on iPhone is supported.

Terminal is enabled per-account and per-country. If your Stripe account was created only for online payments, Terminal capabilities may not be active yet — you enable them in the dashboard or via the API, and Stripe may run additional verification depending on your account’s risk profile and country. Tap to Pay on iPhone is also not available in every Stripe Terminal country; the supported list is narrower than the list of countries where physical readers ship. Confirm your country is on the current list in Stripe’s Tap to Pay documentation before you scope the project, because this is the one requirement you cannot engineer around.

If you operate a platform that puts other merchants on Stripe Terminal — the model we run at payments.bizswoop.app as a Stripe Connect platform — there is an extra layer: each connected account needs Terminal capability provisioned, and the Tap to Pay entitlement is requested by your app, not by each merchant. We cover the platform-side mechanics in the back-office payments guide and in our Stripe Connect economics pillar.

How do I set up Tap to Pay on iPhone with Stripe? (step by step)
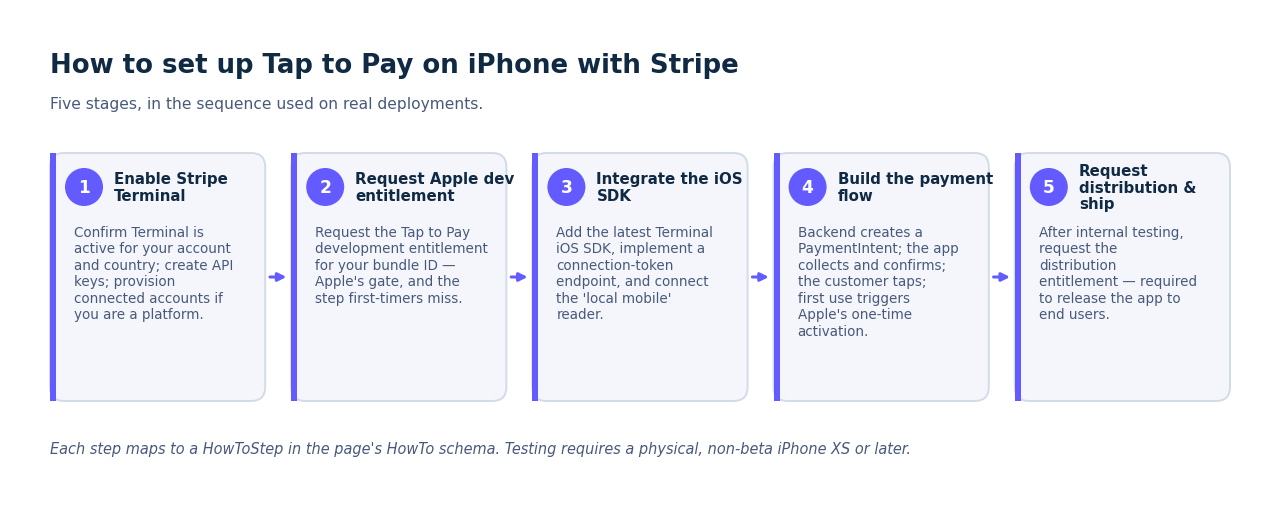
Five numbered steps to set up Tap to Pay on iPhone with Stripe, from Terminal to the distribution entitlement
The development entitlement is Apple’s gate and the step first-timers miss; testing needs a physical, non-beta iPhone.

Set up Tap to Pay on iPhone in five stages: enable Terminal, request the Apple development entitlement, integrate the iOS SDK, run the connection and payment flow in a test environment, then request the distribution entitlement before you ship. The procedure below is the sequence we follow on real deployments.

  1. Enable Stripe Terminal on your account. In the Stripe Dashboard, confirm Terminal is active for your account and country. Create the API keys your backend will use to create PaymentIntents. If you are a platform, provision Terminal capability on the connected accounts that will take payments.
  2. Request the Tap to Pay development entitlement from Apple. In your Apple Developer account, request the Tap to Pay on iPhone development entitlement for your app’s bundle identifier. This is Apple’s gate, not Stripe’s, and it is the step most first-timers miss. Apple grants the development entitlement for internal testing first; you cannot ship to the App Store on it. Stripe outlines the entitlement flow in its Tap to Pay setup docs, and Apple documents it in the Tap to Pay on iPhone developer pages.
  3. Integrate the latest Stripe Terminal iOS SDK. Add the current iOS SDK to your app — always the latest version, because Tap to Pay support and bug fixes land there frequently. Implement a connection-token endpoint on your backend (the SDK calls it to authenticate with Stripe), then use the SDK to discover and connect to the “local mobile” reader, which is how the SDK represents the iPhone itself acting as a reader.
  4. Build the payment flow. Your backend creates a PaymentIntent; the app calls collectPaymentMethod and confirmPaymentIntent through the SDK; the customer taps their card or phone to the top of the iPhone. On first use, the device walks the staff member through a one-time Apple terms acceptance and Tap to Pay activation — budget for this in your onboarding screens.
  5. Request the distribution entitlement and ship. After internal testing succeeds, request the Tap to Pay distribution entitlement from Apple. This is what lets you release the app publicly. Without it, Tap to Pay works on your test devices but not for end users.

How do I test Tap to Pay on iPhone before going live?

Test Tap to Pay on iPhone with the development entitlement on a physical, supported device using Stripe test mode and a real contactless card or wallet — the simulator cannot exercise the NFC read.

Tap to Pay testing has one hard constraint: it requires real hardware. There is no way to simulate an NFC tap in the iOS Simulator, so you need at least one physical iPhone XS-or-later on a public (non-beta) iOS build. Run your app in Stripe test mode, create a test-mode PaymentIntent, and tap a real card — in test mode no money moves, but the full device interaction, terms acceptance, and SDK flow run exactly as they will in production. Verify three things before you call it done: the connection-token endpoint returns cleanly, the first-run Apple activation completes, and a tapped payment appears as a card-present charge in your Stripe test dashboard. We also test on a second device that has not completed activation, to confirm your onboarding handles the first-run flow gracefully.

What are the limitations and edge cases of Tap to Pay on iPhone?

Tap to Pay on iPhone accepts contactless payments only — it cannot read chip-insert or magstripe-swipe cards, and it has no on-device PIN pad for the rare transactions that require offline PIN.

These limits are the honest reason Tap to Pay on iPhone is not a universal answer. The constraints worth planning around:

  • Contactless only. If a customer hands you a card that will not tap — an older card with no contactless chip, or a card whose contactless function is disabled — you cannot fall back to a dip or swipe on the iPhone. For environments where that happens regularly, pair Tap to Pay with a BBPOS WisePad 3 as a backup, or choose a physical reader as the primary.
  • No physical PIN pad. Contactless transactions above local limits may require cardholder verification. On iPhone this is handled on-screen (the customer enters their PIN on the iPhone display via Apple’s secure flow where supported), but it is not the dedicated hardware PIN pad some PIN-preferring markets and B2B card programs expect. Confirm the verification behavior for your country in Stripe’s docs.
  • One sale at a time, on the staff member’s phone. Tap to Pay turns a personal or shared work phone into the register. That is a feature for mobile teams and a constraint for high-volume counters, where a dedicated S700 keeps the line moving and frees staff phones for other work.
  • No beta iOS, passcode and Apple Account required. As noted above, these device-level rules cause field failures more often than any code bug.
  • Battery and connectivity. The iPhone is now doing payments, point-of-sale, and everything else on one battery and one data connection. Mobile teams should plan charging and confirm cellular or Wi-Fi coverage where they collect payments.

In practice we recommend Tap to Pay on iPhone as the primary capture method for mobile and field teams that already carry iPhones and take mostly contactless payments, and as a backup or overflow method for counters that run a physical reader. It is rarely the wrong tool — but it is frequently the only tool a business needs, which is exactly why it is worth setting up correctly.

Frequently asked questions

Do I need a card reader to use Tap to Pay on iPhone with Stripe?

No. Tap to Pay on iPhone uses the iPhone’s built-in NFC antenna to read contactless payments, so there is no external reader to buy, charge, or pair. The phone is the reader.

Which iPhones support Stripe Tap to Pay?

Any iPhone XS or later, running a supported public (non-beta) iOS version — iOS 16.7 or later in the US, UK, and Australia, with higher minimums in some other countries. iPhone X and earlier are not supported. See Stripe’s Tap to Pay documentation for the current per-country list.

Is Tap to Pay on iPhone with Stripe more expensive than using a reader?

No. Tap to Pay charges Stripe’s standard card-present rate of 2.7% + 5¢ per transaction in the US — the same as a physical Stripe reader — with no hardware cost and no separate Tap to Pay fee, per Stripe’s pricing page.

Can Tap to Pay on iPhone accept Apple Pay and Google Pay?

Yes. Because it reads contactless payments, Tap to Pay on iPhone accepts physical contactless cards as well as Apple Pay, Google Pay, Samsung Pay, and other NFC wallets. It cannot accept chip-insert or magstripe-swipe cards.

Do I need an Apple Developer account to set up Tap to Pay on iPhone?

Yes. Tap to Pay requires Apple’s Tap to Pay on iPhone entitlement, which is requested through an Apple Developer account — first a development entitlement for testing, then a distribution entitlement before you release the app publicly. This is required even though Stripe processes the payment.

Can I test Tap to Pay on iPhone without taking real payments?

Yes. Use Stripe test mode with the development entitlement on a physical supported iPhone. You tap a real contactless card to exercise the NFC read, but in test mode no money moves and the charge appears in your test dashboard. The iOS Simulator cannot test Tap to Pay because it has no NFC hardware.

Get the setup right the first time

Tap to Pay on iPhone is the lowest-friction way to accept in-person cards on Stripe — when your team already carries iPhones and your payments are mostly contactless. The setup is straightforward, but the Apple entitlement flow and the device-level rules (no beta iOS, passcode required, contactless-only) are where projects stall.

We have built and shipped Stripe Terminal integrations — including Tap to Pay, physical readers, and Connect-platform deployments — across dozens of industries and 30+ countries. If you want a second set of eyes on your architecture, your entitlement flow, or whether Tap to Pay is even the right capture method for your business, book a free integration consultation with the Jovvie team. We will tell you honestly if a physical reader or a different stack is the better answer for your situation.


Primary sources: Stripe Terminal — Tap to Pay setup, Stripe pricing, Apple Tap to Pay on iPhone for developers.

Tap to Pay on iPhone with Stripe: Setup Guide for 2026

Stylized iPhone reading a contactless tap with Stripe, no external reader, on a bizswoop.com navy banner

To set up Tap to Pay on iPhone with Stripe you need a supported iPhone (iPhone XS or later), a current iOS version (16.7+ in the US, UK, and Australia), a Stripe account with Terminal enabled, and an app built on the Stripe Terminal iOS SDK with Apple’s Tap to Pay entitlement — there is no separate hardware reader to buy or pair. The contactless payment is read by the iPhone’s own NFC antenna, so the entire setup is a software exercise: enable Terminal in your Stripe account, request the Apple entitlement, integrate the SDK, and test against a real card.

We have shipped Stripe Terminal flows across retail counters, pop-ups, field-service trucks, and mobile teams in more than 30 countries, and Tap to Pay on iPhone is the configuration we recommend most often when a business already hands staff an iPhone and does not want one more device to charge, track, and replace. This guide is the setup walkthrough we wish existed: the exact requirements, the entitlement flow that trips up most first-time integrators, how to test the loop end to end, and an honest account of where Tap to Pay on iPhone stops being the right answer. Every claim is checked against Stripe’s primary documentation, linked throughout.

This is a cluster piece in our Stripe Terminal hardware library. If you are choosing between Tap to Pay and a physical reader, start with the hardware pillar; if your staff carry Android phones, read the companion guide on [LINK: M2-tap-to-pay-on-android-stripe-setup-guide] Tap to Pay on Android with Stripe: A 2026 Setup Guide. If you are taking the occasional card without a register at all, the [LINK: M3-stripe-terminal-back-office-payments] Stripe Terminal for Back-Office Payments guide covers when contactless-on-phone beats a counter setup.

What is Tap to Pay on iPhone with Stripe?

Tap to Pay on iPhone with Stripe is a software feature that turns a supported iPhone into a contactless card reader, accepting tap payments — physical contactless cards, Apple Pay, Google Pay, and other mobile wallets — directly through the phone with no external hardware.

The payment is read by the iPhone’s built-in NFC antenna and processed through your Stripe account using the Stripe Terminal iOS SDK, the same SDK that drives Stripe’s physical readers like the S700 and WisePad 3. From Stripe’s perspective, a Tap to Pay charge is a card-present Terminal transaction: it settles at the card-present rate, appears in your dashboard with the same data as a reader charge, and reconciles identically. The difference is purely the capture device — the customer taps the back of the iPhone instead of a dedicated reader. Apple processes the contactless read inside a secure subsystem on the device, so card data never passes through your app. Stripe documents the full picture in its Tap to Pay setup reference.

This matters for the buying decision because Tap to Pay on iPhone removes the single most annoying part of mobile card acceptance: the second device. There is no reader to charge overnight, no Bluetooth pairing that drops mid-sale, and no $59-to-$349 hardware line item. If your team already carries iPhones, your hardware cost for accepting in-person cards is effectively zero. What you are buying instead is a small amount of integration work and a set of constraints, both of which this guide covers in full.

How much does Tap to Pay on iPhone cost with Stripe?

Table comparing Tap to Pay, M2, WisePad 3 and S700 on hardware cost and the shared card-present rate
Every Stripe in-person option charges 2.7% + 5¢; Tap to Pay just removes the hardware line item.

Tap to Pay on iPhone charges the same Stripe card-present processing rate as any Terminal reader — 2.7% + 5¢ per successful transaction in the United States, per Stripe’s pricing page — with no hardware cost and no separate Tap to Pay fee.

That is the quiet advantage: you get Stripe’s lower card-present rate (versus the 2.9% + 30¢ online rate) without buying any hardware. The only costs are your Apple Developer Program membership ($99/year, which most teams shipping an iOS app already pay) and the engineering time to integrate the SDK. Over a three-year horizon, Tap to Pay on iPhone is the lowest total cost of ownership of any Stripe in-person option for businesses that already deploy iPhones.

What devices and iOS versions does Stripe Tap to Pay require?

Requirements table listing iPhone XS or later, per-region iOS minimums and Stripe account prerequisites for Tap to Pay
Two rules catch teams off guard: no beta iOS builds, and every device needs a passcode and Apple Account.

Tap to Pay on iPhone with Stripe requires an iPhone XS or later running a recent iOS version, and the minimum iOS depends on your country.

The hardware floor is fixed by Apple, not Stripe: any iPhone XS or newer has the NFC subsystem Tap to Pay needs. Older models (iPhone X and earlier) cannot run it at all, regardless of iOS version. The iOS minimum varies by launch region because Apple rolled the feature out on different timelines. Per Stripe’s documentation, the current minimums are:

RegionMinimum iOS version
United States, United Kingdom, AustraliaiOS 16.7 or later
France, Italy, NetherlandsiOS 17.0 or later
CanadaiOS 17.4 or later
Other supported regionsCheck Stripe’s Tap to Pay docs for current minimums

Two device rules catch teams off guard. First, Tap to Pay does not run on iOS beta releases — if a staff member has enrolled their phone in Apple’s beta program, taps will fail until they return to a public release. Second, the phone must have a passcode set and be signed in to an Apple Account, because Apple ties the secure payment subsystem to device-level authentication. We check both of these before any rollout; a device fleet that “meets the spec” on paper can still fail in the field because half the phones are on a beta build or have no passcode.

What Stripe account requirements must I meet first?

Before any code runs, your Stripe account must have Terminal enabled and be in a country where Tap to Pay on iPhone is supported.

Terminal is enabled per-account and per-country. If your Stripe account was created only for online payments, Terminal capabilities may not be active yet — you enable them in the dashboard or via the API, and Stripe may run additional verification depending on your account’s risk profile and country. Tap to Pay on iPhone is also not available in every Stripe Terminal country; the supported list is narrower than the list of countries where physical readers ship. Confirm your country is on the current list in Stripe’s Tap to Pay documentation before you scope the project, because this is the one requirement you cannot engineer around.

If you operate a platform that puts other merchants on Stripe Terminal — the model we run at payments.bizswoop.app as a Stripe Connect platform — there is an extra layer: each connected account needs Terminal capability provisioned, and the Tap to Pay entitlement is requested by your app, not by each merchant. We cover the platform-side mechanics in the [LINK: M3-stripe-terminal-back-office-payments] back-office payments guide and in our Stripe Connect economics pillar.

How do I set up Tap to Pay on iPhone with Stripe? (step by step)

Five numbered steps to set up Tap to Pay on iPhone with Stripe, from Terminal to the distribution entitlement
The development entitlement is Apple’s gate and the step first-timers miss; testing needs a physical, non-beta iPhone.
Annotated iPhone screenshot of the first-run Apple Tap to Pay activation and terms acceptance flow
The one-time Apple activation a staff member completes on first use — build for it in your onboarding screens.

Set up Tap to Pay on iPhone in five stages: enable Terminal, request the Apple development entitlement, integrate the iOS SDK, run the connection and payment flow in a test environment, then request the distribution entitlement before you ship. The procedure below is the sequence we follow on real deployments.

  1. Enable Stripe Terminal on your account. In the Stripe Dashboard, confirm Terminal is active for your account and country. Create the API keys your backend will use to create PaymentIntents. If you are a platform, provision Terminal capability on the connected accounts that will take payments.
  2. Request the Tap to Pay development entitlement from Apple. In your Apple Developer account, request the Tap to Pay on iPhone development entitlement for your app’s bundle identifier. This is Apple’s gate, not Stripe’s, and it is the step most first-timers miss. Apple grants the development entitlement for internal testing first; you cannot ship to the App Store on it. Stripe outlines the entitlement flow in its Tap to Pay setup docs, and Apple documents it in the Tap to Pay on iPhone developer pages.
  3. Integrate the latest Stripe Terminal iOS SDK. Add the current iOS SDK to your app — always the latest version, because Tap to Pay support and bug fixes land there frequently. Implement a connection-token endpoint on your backend (the SDK calls it to authenticate with Stripe), then use the SDK to discover and connect to the “local mobile” reader, which is how the SDK represents the iPhone itself acting as a reader.
  4. Build the payment flow. Your backend creates a PaymentIntent; the app calls collectPaymentMethod and confirmPaymentIntent through the SDK; the customer taps their card or phone to the top of the iPhone. On first use, the device walks the staff member through a one-time Apple terms acceptance and Tap to Pay activation — budget for this in your onboarding screens.
  5. Request the distribution entitlement and ship. After internal testing succeeds, request the Tap to Pay distribution entitlement from Apple. This is what lets you release the app publicly. Without it, Tap to Pay works on your test devices but not for end users.

How do I test Tap to Pay on iPhone before going live?

Test Tap to Pay on iPhone with the development entitlement on a physical, supported device using Stripe test mode and a real contactless card or wallet — the simulator cannot exercise the NFC read.

Tap to Pay testing has one hard constraint: it requires real hardware. There is no way to simulate an NFC tap in the iOS Simulator, so you need at least one physical iPhone XS-or-later on a public (non-beta) iOS build. Run your app in Stripe test mode, create a test-mode PaymentIntent, and tap a real card — in test mode no money moves, but the full device interaction, terms acceptance, and SDK flow run exactly as they will in production. Verify three things before you call it done: the connection-token endpoint returns cleanly, the first-run Apple activation completes, and a tapped payment appears as a card-present charge in your Stripe test dashboard. We also test on a second device that has not completed activation, to confirm your onboarding handles the first-run flow gracefully.

What are the limitations and edge cases of Tap to Pay on iPhone?

Tap to Pay on iPhone accepts contactless payments only — it cannot read chip-insert or magstripe-swipe cards, and it has no on-device PIN pad for the rare transactions that require offline PIN.

These limits are the honest reason Tap to Pay on iPhone is not a universal answer. The constraints worth planning around:

  • Contactless only. If a customer hands you a card that will not tap — an older card with no contactless chip, or a card whose contactless function is disabled — you cannot fall back to a dip or swipe on the iPhone. For environments where that happens regularly, pair Tap to Pay with a BBPOS WisePad 3 as a backup, or choose a physical reader as the primary.
  • No physical PIN pad. Contactless transactions above local limits may require cardholder verification. On iPhone this is handled on-screen (the customer enters their PIN on the iPhone display via Apple’s secure flow where supported), but it is not the dedicated hardware PIN pad some PIN-preferring markets and B2B card programs expect. Confirm the verification behavior for your country in Stripe’s docs.
  • One sale at a time, on the staff member’s phone. Tap to Pay turns a personal or shared work phone into the register. That is a feature for mobile teams and a constraint for high-volume counters, where a dedicated S700 keeps the line moving and frees staff phones for other work.
  • No beta iOS, passcode and Apple Account required. As noted above, these device-level rules cause field failures more often than any code bug.
  • Battery and connectivity. The iPhone is now doing payments, point-of-sale, and everything else on one battery and one data connection. Mobile teams should plan charging and confirm cellular or Wi-Fi coverage where they collect payments.

In practice we recommend Tap to Pay on iPhone as the primary capture method for mobile and field teams that already carry iPhones and take mostly contactless payments, and as a backup or overflow method for counters that run a physical reader. It is rarely the wrong tool — but it is frequently the only tool a business needs, which is exactly why it is worth setting up correctly.

Frequently asked questions

Do I need a card reader to use Tap to Pay on iPhone with Stripe?

No. Tap to Pay on iPhone uses the iPhone’s built-in NFC antenna to read contactless payments, so there is no external reader to buy, charge, or pair. The phone is the reader.

Which iPhones support Stripe Tap to Pay?

Any iPhone XS or later, running a supported public (non-beta) iOS version — iOS 16.7 or later in the US, UK, and Australia, with higher minimums in some other countries. iPhone X and earlier are not supported. See Stripe’s Tap to Pay documentation for the current per-country list.

Is Tap to Pay on iPhone with Stripe more expensive than using a reader?

No. Tap to Pay charges Stripe’s standard card-present rate of 2.7% + 5¢ per transaction in the US — the same as a physical Stripe reader — with no hardware cost and no separate Tap to Pay fee, per Stripe’s pricing page.

Can Tap to Pay on iPhone accept Apple Pay and Google Pay?

Yes. Because it reads contactless payments, Tap to Pay on iPhone accepts physical contactless cards as well as Apple Pay, Google Pay, Samsung Pay, and other NFC wallets. It cannot accept chip-insert or magstripe-swipe cards.

Do I need an Apple Developer account to set up Tap to Pay on iPhone?

Yes. Tap to Pay requires Apple’s Tap to Pay on iPhone entitlement, which is requested through an Apple Developer account — first a development entitlement for testing, then a distribution entitlement before you release the app publicly. This is required even though Stripe processes the payment.

Can I test Tap to Pay on iPhone without taking real payments?

Yes. Use Stripe test mode with the development entitlement on a physical supported iPhone. You tap a real contactless card to exercise the NFC read, but in test mode no money moves and the charge appears in your test dashboard. The iOS Simulator cannot test Tap to Pay because it has no NFC hardware.

Get the setup right the first time

Tap to Pay on iPhone is the lowest-friction way to accept in-person cards on Stripe — when your team already carries iPhones and your payments are mostly contactless. The setup is straightforward, but the Apple entitlement flow and the device-level rules (no beta iOS, passcode required, contactless-only) are where projects stall.

We have built and shipped Stripe Terminal integrations — including Tap to Pay, physical readers, and Connect-platform deployments — across dozens of industries and 30+ countries. If you want a second set of eyes on your architecture, your entitlement flow, or whether Tap to Pay is even the right capture method for your business, book a free integration consultation with the BizSwoop team. We will tell you honestly if a physical reader or a different stack is the better answer for your situation.


Primary sources: Stripe Terminal — Tap to Pay setup, Stripe pricing, Apple Tap to Pay on iPhone for developers.

Leave a Reply

Your email address will not be published. Required fields are marked *